
Monday, November 5, 2012
Wednesday, October 10, 2012
Simulation of particle fireworks using OOP JavaScript and HTML5 environment.
HTML5 gives us a wide range of possibilities to bring power of Java applet and OpenGL graphics to
a world of web pages. This article demonstrates how to create a program Particle Fireworks to simulate
falling bodies with help of object oriented JavaScript, JQuery and HTML5 canvas element. To change the amount of spawns flying
bodies slide the handler on the left of the screen. To stop or start simulation click at the button on the left top corner. The source code is available at https://github.com/serjio28/ParticleFireworks
1.Physics of falling bodies
 Before start programming, let's consider the physics of a falling body and prepare formulas
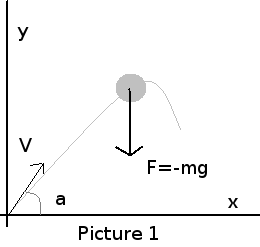
to simulate body motions. Picture #1 outlines the forces which impact on the falling body.
To make things simple we will consider only gravity force F=-mg, where g is a constant 9.82.
The force impacts along the backward direction regarding axe Y and therefore has a negative sign.
In according to the second Newton law let's write formulas of the forces which impacts on the body
in regarding to the each axe.
Before start programming, let's consider the physics of a falling body and prepare formulas
to simulate body motions. Picture #1 outlines the forces which impact on the falling body.
To make things simple we will consider only gravity force F=-mg, where g is a constant 9.82.
The force impacts along the backward direction regarding axe Y and therefore has a negative sign.
In according to the second Newton law let's write formulas of the forces which impacts on the body
in regarding to the each axe.
1.Acceleration is a second derivative of the distance so we can write for axe Y:
2. Do the first integration. C0 - is an initial velocity

3. Do the second integration. C1 - is an initial displacement on axe y

4. Since C0 is a vector we need to find out a projection of the initial velocity to the axe Y

5. Write out a final formula we will use to find position of the object on axe y

6. Write the second Newton law for the forces impact on axe X

7. Do the first integration

8. Do the second integration

9. Find projection of the initial velocity to axe X

10. Write down a final formula to find position of the object on axe X

11. Finally outline the both formulas we will use to find position of the object
2. Programming
Following a paradigm of the object oriented programming we define a class that will keep all necessary methods and properties of a single body. First at all define a constructor that will accept the resolution of the current window, canvas descriptor, the initial position of the body, trace length, initial velocity and angle.
The source code is available at https://github.com/serjio28/ParticleFireworks
1.Physics of falling bodies
Before start programming, let's consider the physics of a falling body and prepare formulas
to simulate body motions. Picture #1 outlines the forces which impact on the falling body.
To make things simple we will consider only gravity force F=-mg, where g is a constant 9.82.
The force impacts along the backward direction regarding axe Y and therefore has a negative sign.
In according to the second Newton law let's write formulas of the forces which impacts on the body
in regarding to the each axe.1.Acceleration is a second derivative of the distance so we can write for axe Y:
2. Do the first integration. C0 - is an initial velocity
3. Do the second integration. C1 - is an initial displacement on axe y
4. Since C0 is a vector we need to find out a projection of the initial velocity to the axe Y
5. Write out a final formula we will use to find position of the object on axe y
6. Write the second Newton law for the forces impact on axe X
7. Do the first integration
8. Do the second integration
9. Find projection of the initial velocity to axe X
10. Write down a final formula to find position of the object on axe X
11. Finally outline the both formulas we will use to find position of the object
2. Programming
Following a paradigm of the object oriented programming we define a class that will keep all necessary methods and properties of a single body. First at all define a constructor that will accept the resolution of the current window, canvas descriptor, the initial position of the body, trace length, initial velocity and angle.
function MotionObject(H,W, GraphCanvas, Radius, X, Y, path_max, v0, alfa, g) {
...
}
MotionObject.prototype.draw = function(color,x,y,r) {
    this.context.fillStyle = color;
    this.context.strokeStyle= color;
    this.context.beginPath();
    this.context.arc(x,y,r, 0, Math.PI * 2, true);
    this.context.closePath();
    this.context.fill();
    this.context.stroke();
}
MotionObject.prototype.Xmove = function() {
    this.x=  this.xShift + Math.ceil(this.v0 * Math.cos(this.alfa))* this.t*this.time_divider;
}
MotionObject.prototype.Ymove = function() {
    this.y=  this.H - Math.ceil(  this.v0 * Math.sin(this.alfa)* this.t*this.time_divider - (this.g * this.t* this.t)/2 );
}
MotionObject.prototype.life = function() {
    this.move();
    this.paint(this.x,this.y, this.r);
}
function GraphCanvas(d, rlimit) {
...
}
GraphCanvas.prototype.createCanvas = function() {
    var GraphCanvasObject = this;
    ...
    var canvas_definition = ["<canvas width='" + this.WIDTH + "' height='" + this.HEIGHT+ "' style=\"display:none\"><canvas>",
    "<canvas width='"+ this.WIDTH+ "' height='"+ this.HEIGHT+ "' style=\"z-index:1;position: absolute; padding-left: 0;padding-right: 0;margin-left: auto; margin-right: auto;\"></canvas>" ];

    for ( var i = 0; i < canvas_definition.length; i++) {
        try {
            // initialize a canvas
            var canvas = $(canvas_definition[i]);
            // get context and graph
            this.canvasContext[i] = canvas.get(0).getContext("2d");
            this.canvasGraph[i] = canvas.get(0);
            // add the context to body of the document
            canvas.appendTo('body');
        } catch (e) {
            var message = e.message;
            var name = e.name;
            console.log(" name:" + name + " message:" + _message);
            return false;
        }
    }
    return true;
};
GraphCanvas.prototype.launch = function() {
    var GraphCanvasObject = this;
    this.hAnimation = setInterval(function() {
        GraphCanvasObject.life();
    }, Math.ceil(1000 / 25));
    ....
...
    this.hObjectGen = setInterval(function() {
        if(GraphCanvasObject.mutex == 0) {
            GraphCanvasObject.mutex = 1;
            var x = 100;
            var angle = Math.random() * (Math.PI);
            var v0 = Math.random() * 20;
            if (v0 > 5 && angle > Math.PI/6 && angle < 5*Math.PI/6) {
                var Obj = new MotionObject(GraphCanvasObject.HEIGHT, GraphCanvasObject.WIDTH,
                GraphCanvasObject.canvasContext[1], 1, GraphCanvasObject.w_middle, GraphCanvasObject.HEIGHT - 10, 5, v0, angle,9.82);
                if(Obj!=undefined) GraphCanvasObject.addObject(Obj);
            };
            GraphCanvasObject.mutex = 0;
        };
    }, this.ball_frequency);
};
GraphCanvas.prototype.life = function() {
    var deadlock_detect = 0;
    if (this.mutex == 0) {
        this.mutex = 1;
        if (this.Inhabitans.length == 0) {
            this.terminate();
        };

        for ( var i = 0; i < this.Inhabitans.length; i++) {
            var item = this.Inhabitans[i];
            if (item != undefined) {
                if (item.isDied()) {
                    delete this.Inhabitans[i];
                    this.Inhabitans.splice(i, 1);
                };
            };
        }
        var r = "";
        this.Inhabitans.forEach(function(item) {
            if (item != undefined){
                item.life();
            };
        });;
        this.mutex = 0;
    };
    this.canvasContext[1].drawImage(this.canvasGraph[0], 0, 0);
};
var GC = new GraphCanvas(2, 500);
if (GC.createCanvas()) {
    var Obj = new MotionObject(GC.HEIGHT, GC.WIDTH, GC.canvasContext[1], 1,
    GC.w_middle, GC.HEIGHT - 10, 5, 10, Math.PI / 4, 9.82);
    GC.addObject(Obj);
    GC.launch();
}
The source code is available at https://github.com/serjio28/ParticleFireworks
Sunday, September 23, 2012
GPS tracker for Android

Being in mountains I often ask myself - what's the current altitude above sea level and how many meters we got from the starting. This summer I decided to create Android application to always know this valuable information. In addition to the altitude it would be helpful to know longitude, latitude, current accuracy of GPS signal and have an ability to track the received data for the further analyze.
2. What's GPS
Before we go, let's check what's we know about GPS.
- It is absolutely free and available for everyone.
- The whole system consists of 24 satellites on Earth orbit at an altitude of about 24,000 meters.
- Each satellite transmits frames with the current time and satellite position.
- Four or more satellites must be visible to obtain an accurate result.
- The accuracy of the GPS signal is the same for the civilian GPS service (SPS) and the military GPS service (PPS).
- My Smart GSmart 1310 has chipset Qualcomm MSM7225-1 with embedded gpsOne Gen 7 GPS module.
Those who need the details can refer to the GPS official site at http://www.gps.gov.
3. Requirements
Even though Android gives us a wide range of possibilities (GPS, Cell-ID and WiFi) to acquire our location we are interested in GPS method.
I consider to make an application for outdoor activities where we can rely to GPS signal only.
First at all, we are expecting the program shows as at least: latitude, longitude, altitude and detected accuracy. Secondly, it must be able to save shown data in a file on SD card for further analyze.
4. Implementation
We will use Eclipse as an IDE for the program development. It seems to be the best framework to create and build Android applications.
It is important that the program has necessary permissions to access the resources. We need GPS and SD card, therefore the below lines must be in AndroidManifest.xml
<uses-permission android:name="android.permission.ACCESS_FINE_LOCATION">
<uses-permission android:name="android.permission.WRITE_EXTERNAL_STORAGE">
<uses-permission android:name="android.permission.MODE_WORLD_WRITABLE"> - GPS asyncronous listener
- functions and handlers to receive data from GPS listener to show the information on the screen or send to a file.
Perhaps the first question that comes to a programmer who want to write GPS application is - Where can I get GPS data? Android has a special class LocationManager to provide access to a wide range of location services. First at all we need to activate it and check whether GPS provider is available in the current configuration:
mLocationManager = (LocationManager) getSystemService(Context.LOCATION_SERVICE);
gpsEnabled = mLocationManager.isProviderEnabled(LocationManager.GPS_PROVIDER);if(gpsEnabled == true){
mLocationManager.requestLocationUpdates(LocationManager.GPS_PROVIDER, minTime, minDistance , GPSlistener);
};minDistance - minimum distance between location updates, in meters
GPSlistener - an object which method onLocationChanged(Location) will be called for each location update.
Consider this listener in details.
private final LocationListener GPSlistener = new LocationListener() {
    public void onLocationChanged(Location location) {
           ...
    }
}; // define variables
double alt, latitude, longitude;
float bear, speed, acc;
// get current accuracy
acc = location.getAccuracy();
// Altitude
alt = location.getAltitude();
// Latitude
latitude = location.getLatitude();
// Longitude
longitude = location.getLongitude();
Well, now we have the information we are interested in. But how to show it on the screen and save to a file? Obviously, we cannot do it from the method onLocationChanged. It is a listener and doesn't have an access to a screen and file. Fortunately, there is a way to communicate between GPS listener and the main parts of the program. On start we need to define Handler object and manage its method handleMessages to receive messages outside. Each message has unique identifier Message.what that helps us to distinguish them from each other. The below snap explains how to register Handler and receive messages
public void onCreate(Bundle savedInstanceState) {
        super.onCreate(savedInstanceState);
        setContentView(R.layout.main);

        // find references to the main fields
        mAlt = (TextView) findViewById(R.id.alt);

        // define receiver of the main commands from GPS block
        mHandler = new Handler() {
           public void handleMessage(Message msg) {
                switch (msg.what) {
                case UPDATE_ALT:
                    mAlt.setText((String) msg.obj);
                    break;
                }
            }
        }; // end of mHandler
};
Now we need to add message sending to Location listener to deliver GPS information to Handler we registered above.
double alt = location.getAltitude();
Message.obtain(mHandler, UPDATE_ALT,String.format("%.2f", alt) + " meters").sendToTarget();
Once the application is finishing the GPS listener must be disabled.
mLocationManager.removeUpdates(GPSlistener);Well, now the program delivers GPS information to the screen. Next step is to take care of the tracking the data over time. It can be done through saving each GPS point to a file.
Let's add new code to GPS listener. To keep things simple we will pass a completed string with all available GPS information of the current point: time, latitude, longitude,accuracy, bearing and speed. For example:
1344522949506;38.85288574;69.00157641;2363.10009765625;7.0;93.1;0.5;
String toMark = getTime + ";" + latitude + ";" + longitude + ";" + alt + ";" + acc + ";" + bear + ";" + speed + ";";
Message.obtain(mHandler, UPDATE_MARK, toMark).sendToTarget();
mHandler = new Handler() {
   public void handleMessage(Message msg) {
    switch (msg.what) {
    ...
    case UPDATE_MARK:
     WriteToFile((String) msg.obj);
     break;
    }
   }
  }; // end of mHandler
private boolean WriteToFile(String data) {
  try {
   // Write data to a file to keep tracking
   File extStore = Environment.getExternalStorageDirectory();
   String SD_PATH = extStore.getAbsolutePath();

   File gps_data = new File(SD_PATH + "/" + file_name);

   FileWriter writer = new FileWriter(gps_data, true);
   writer.append(data + "\n");
   writer.flush();
   writer.close();
   Log.d(TAG, "Data saved OK");

  } catch (FileNotFoundException e) {
   Log.d(TAG, "File not found: " + e.getMessage());
   return false;
  } catch (IOException e) {
   Log.d(TAG, "Error accessing file: " + e.getMessage());
   return false;
  }
  return true;
 }
file_name = CurrentDateFormatted() + ".txt";
public static String CurrentDateFormatted() {
  String ret;
  SimpleDateFormat dateFormat = new SimpleDateFormat(
    "HH_mm_ss_yyyy_MM_dd");
  Date date = new Date();
  ret = dateFormat.format(date);

  return ret;
 };
The above explains the main design of the program. The full source code of the application is available here:
https://github.com/serjio28/gps_tracker.git
Monday, September 17, 2012
Debian Iceweasel and cache of IcedTea plugin.
Today I found that iceweasel doesn't show Java applets. Nothing error
messages or warning but only weird gray box on the web page. Well, just
one more quiz I need to solve.
Next three hours I considered the such solutions as:
1. Tried to set another version of JDK: update-alternatives --config java
2. Downloaded, built and installed the latest release of IcedTea plugin from http://icedtea.classpath.org/wiki/IcedTea-Web
3. Tested all mozilla and chrome compatible browsers I have here.
Nothing was helpful. Accidentally I have launched iceweasel from "root" console and
was greatly surprised founding that Jave plugin works now.
There was a problem with plugin cache at ~/.icedtea. Having deleted the cache I make
my browser work. Sometimes the solution is pretty easy.
Monday, September 10, 2012
Wireless 802.11 virtual access point on Linux.
Notebook,
desktop computer, smartphone, another notebook and only
one wire by Internet provider. How to make all these devices to have
an access to
a global net from my home? Frankly, time to time I connected them
to each other over
ad-hoc wireless but it isn't a good way yet. First at all, ad-hoc
supports only weak
WEP encryption ( just imagine how my neighbors would laugh watching
at my wifi
station with WEP security while others keep WAP2 only) and secondly
Android doesn't
recognized ad-hoc. Therefore
I need wireless Access Point to share Internet across my devices.
This story I will explain how to install AP on ASUS notebook N73S, AR9285 wireless adapter on Linux Debian wheezy/sid release. As a client I will use smartphone GSmart G1310 with Android 2.2.
1.
First at all, let's check PCI bus to find out the device:
#
lspci | grep AR9285
03:00.0
Network controller: Atheros Communications Inc. AR9285 Wireless
Network Adapter (PCI-Express) (rev 01)
2.
Next, let's make Linux kernel to see the wireless network card. On the my
case I have the
following options turned on:
Networking
support->Wireless->cfg80211-wireless configuration API
[CONFIG_CFG80211]
Networking
support->Wireless->Generic IEEE 802.11 Networking Stack
[CONFIG_MAC80211]
Device
drivers->Network device support->Wireless LAN->Atheros
Wireless Cards->Atheros 802.11n wireless card support
[CONFIG_ATH9K]
3.
Check whether Ath9k kernel modules has been installed for the device
#
dmesg | grep ath9k
[
7.937533] ath9k 0000:03:00.0: PCI INT A -> GSI 17 (level, low)
-> IRQ 17
[
7.937545] ath9k 0000:03:00.0: setting latency timer to 64
[
8.033245] ieee80211 phy0: Selected rate control algorithm
'ath9k_rate_control'
[
8.033657] Registered led device: ath9k-phy0
4.
At this step we need wireless-tools to be installed. We will not use
them during the setup but
it may be helpful to check the status of the device. The next package
wpasupplicant is
needed to generate WPA2 PSK key.
#apt-get
install wireless-tools wpasupplicant
5.
Let's check that Linux has recognized the wireless card and it's
available to use
#
iwconfig
wlan0
IEEE 802.11bgn Mode:Master Frequency:2.437 GHz Tx-Power=16 dBm
6.
Now the time of hostapd. It is available in Debian but to get better
compatibility let's build it from source. Source
can be downloaded here http://hostap.epitest.fi/hostapd/.
Download
and upack the archive:
#wget
http://hostap.epitest.fi/releases/hostapd-1.0.tar.gz
#tar
xvfz hostapd-1.0.tar.gz
#cd
hostapd-1.0/hostapd
7.
Next we need to check the default settings and perhaps change them.
#cp
defconfig .config
Open
.config file in any editor and ensure that below variables are turned
on:
CONFIG_DRIVER_HOSTAP=y
CONFIG_IAPP=y
8.
Build the daemon
#
make && make install
9.
I don't plan to have a lot of wireless clients for my AP, so WPA2
with predefined passphrase is
enough for me. wpa_passphrase can help us to generate PSK key. Launch
it with your SSID and any
passphrase.
#
wpa_passphrase your_ssid passphrase
network={
ssid="your_network"
#psk="passphrase"
psk=0332fcb2d40e47f4e594bec01a0db94756c50d2f1bdf155585f6e54912c86fac
}
10.
Open /etc/hostapd/hostapd.conf and update the file. Change "ssid"
to your SSID and
wpa_passphrase, wpa_psk to the values obtained with help of
wpa_passphrase
interface=wlan0
driver=nl80211
ssid=PUT_YOUR_SSID_HERE
hw_mode=g
channel=6
macaddr_acl=1
auth_algs=1
accept_mac_file=/etc/hostapd/hostapd.accept
ignore_broadcast_ssid=0
wpa=2
debug=2
wpa_passphrase="put_your_passphrase_here"
wpa_psk=put_your_psk_here
wpa_key_mgmt=WPA-PSK
wpa_pairwise=TKIP
CCMP
rsn_pairwise=CCMP
logger_syslog=-1
logger_syslog_level=1
I
use MAC authentication with hardware addresses listed in
/etc/hostapd/hostapd.accept. Below
the example of /etc/hostapd/hostapd.accept
00:11:22:33:44:55
11.
Test the configuration
hostapd
can be launched as in background as well in the foreground mode. The
last one is useful to
debug the configuration. Once it is done daemon can be set to start
from /etc/init.d. Let's
start hostapd and try to connect with a wireless client.
#/usr/local/bin/hostapd -P /var/run/hostapd.pid /etc/hostapd/hostapd.conf
I will use
smartphone GSmart
1310 with Android 2.2. First at all make
Settings->Wireless&Networks->Wi-Fi turned on. Next
open Settings->Wireless&Networks->Wi-Fi settings and find
the network by SSID. The
network must have the property: "Secured with WPA/WPA2 PSK" Click
at the network and input WPA2 passphrase exactly the same that was
used to generate PSK
key for hostap. Android will start the negotiation and halt on with
the message "Obtaining
IP address". That's fine and we will get rid of this on next
steps. Let's
check the hosapd daemon. Open /var/log/syslog and find its messages:
hostapd:
wlan0: STA 70:f3:95:xx:xx:62 IEEE 802.11: authentication OK (open
system)
hostapd:
wlan0: STA 70:f3:95:xx:xx:62 MLME:
MLME-AUTHENTICATE.indication(70:f3:95:xx:xx:62, OPEN_SYSTEM)
hostapd:
wlan0: STA 70:f3:95:xx:xx:62 MLME:
MLME-DELETEKEYS.request(70:f3:95:xx:xx:62)
hostapd:
wlan0: STA 70:f3:95:xx:xx:62 IEEE 802.11: authenticated
hostapd:
wlan0: STA 70:f3:95:xx:xx:62 IEEE 802.11: association OK (aid 1)
hostapd:
wlan0: STA 70:f3:95:xx:xx:62 IEEE 802.11: associated (aid 1)
hostapd:
wlan0: STA 70:f3:95:xx:xx:62 MLME:
MLME-ASSOCIATE.indication(70:f3:95:xx:xx:62)
hostapd:
wlan0: STA 70:f3:95:xx:xx:62 MLME:
MLME-DELETEKEYS.request(70:f3:95:xx:xx:62)
hostapd:
wlan0: STA 70:f3:95:xx:xx:62 WPA: event 1 notification
hostapd:
wlan0: STA 70:f3:95:xx:xx:62 WPA: start authentication
hostapd:
wlan0: STA 70:f3:95:xx:xx:62 IEEE 802.1X: unauthorizing port
hostapd:
wlan0: STA 70:f3:95:xx:xx:62 WPA: sending 1/4 msg of 4-Way Handshake
hostapd:
wlan0: STA 70:f3:95:xx:xx:62 WPA: received EAPOL-Key frame (2/4
Pairwise)
hostapd:
wlan0: STA 70:f3:95:xx:xx:62 WPA: sending 3/4 msg of 4-Way Handshake
hostapd:
wlan0: STA 70:f3:95:xx:xx:62 WPA: received EAPOL-Key frame (4/4
Pairwise)
hostapd:
wlan0: STA 70:f3:95:xx:xx:62 IEEE 802.1X: authorizing port
hostapd:
wlan0: STA 70:f3:95:xx:xx:62 RADIUS: starting accounting session
5046E9FE-00000002
hostapd:
wlan0: STA 70:f3:95:xx:xx:62 WPA: pairwise key handshake completed
(RSN)
Below
information indicates that hosapd and smartphone have been connected
to each other and established
wireless connection on data link layer.
12.
We still cannot work over the connection because wireless client has
not been got the correct IP
address, default route and DNS. Now the time to take care of all of
this. To make it work we
need DHCP server behind wireless AP.
#
apt-get install isc-dhcp-server
14.
Let's make it is listening on the wireless interface. Open
/etc/default/isc-dhcp-server and
add the following lines:
DHCPD_CONF=/etc/dhcp/dhcpd.conf
INTERFACES="wlan0"
15.
Configure wireless network, default router and DSN settings.
Open
file /etc/dhcp/dhcpd.conf and update it.
subnet
192.168.1.0 netmask 255.255.255.0 {
range
192.168.1.2 192.168.1.3;
option
domain-name-servers 192.168.1.1;
option
routers 192.168.1.1;
option
broadcast-address 192.168.1.255;
default-lease-time
600;
max-lease-time
7200;
}
16.
Restart the DHCP server and try attempt to connect from Android to AP
again. Now
/var/log/syslog shows that the client has been got IP, default route
and DNS
dhcpd:
DHCPDISCOVER from 70:f3:95:xx:xx:62 via wlan0
dhcpd:
DHCPOFFER on 192.168.1.2 to 70:f3:95:xx:xx:62 via wlan0
dhcpd:
DHCPREQUEST for 192.168.1.2 (192.168.1.1) from 70:f3:95:e0:xx:62 via
wlan0
Look
at the Android Wi-Fi settings. The status on the connection has
changed to "Connected".
#
ping 192.168.1.2
PING
192.168.1.2 (192.168.1.2) 56(84) bytes of data.
64
bytes from 192.168.1.2: icmp_req=1 ttl=64 time=19.4 ms
So
we have established the network connection between the server with
wireless AP and Android
client. But there is still a problem to get something behind the AP
server.
17.
Enable NAT.
Any
wireless client that is connected to the AP uses private network
192.168.1.0 we
assigned in DHCP settings. Private networks are reserved to local use
only and cannot
be routed through Internet. So to make a wireless client access
Internet we
need to NAT it to IP address that uses AP server.
Allow
forward of the wireless network between interfaces
#iptables
-A FORWARD -i wlan0 -s 192.168.1.0/24 -d 0/0 -j ACCEPT
Masquerade
the network
#iptables
-t nat -A POSTROUTING -s 192.168.1.0/24 -d 0/0 -j MASQUERADE -v
18.
Make a final test.
Get
Android smartphone, click at browser and test any site. It must work
now.
Monday, August 27, 2012
Convert AVI to show on Android
Today I got an idea to watch a movie on my Android smartphone (G1310). Why not? I had plugged USB, copied the file over adb to smartphone and then have clicked the file on FileManager. Android has answered with alert box - "Sorry, this video cannot be played". Well, it seems that the matter needs a little research.
First at all, what's movie formats supports Android? Perhaps there are a lot of them but we need at least one. Let's make a short video with Android camcoder and then analyze the file with ffmpeg. Here the what I got for the file made by Android:
Video: mpeg4 (Simple Profile), yuv420p, 640x480, 1456 kb/s
Audio: amrnb, 8000 Hz, 1 channels, flt, 12 kb/s
Let's compare the above with the movie I wasn't able to watch previously:
Video: mpeg4 (Simple Profile), yuv420p, 320x240
Audio: mp3, 44100 Hz, stereo, s16, 125 kb/s
The video parts of each file seems to be mostly identical. So why Android refused to accept my movie? The answer is a file format or media container. I got it after an hour of detailed analyze because ffmpeg doesn't show it by default. The movie file I tried to watch has AVI format but Android expects 3GP files. So let's try to convert it now. To be on the safe place we will change audio part too to look like the one we have on Android movie I made as an experiment previously.
Or use video codec mpeg4, output file format 3GP, leave one audio channel with audio bitrate 12K, audio sampling frequency 8000, video bit rate 1456K and resolution 640x480.
Once I had converted the movie I uploaded it to my smartphone and found that I can watch it now.
First at all, what's movie formats supports Android? Perhaps there are a lot of them but we need at least one. Let's make a short video with Android camcoder and then analyze the file with ffmpeg. Here the what I got for the file made by Android:
Video: mpeg4 (Simple Profile), yuv420p, 640x480, 1456 kb/s
Audio: amrnb, 8000 Hz, 1 channels, flt, 12 kb/s
Let's compare the above with the movie I wasn't able to watch previously:
Video: mpeg4 (Simple Profile), yuv420p, 320x240
Audio: mp3, 44100 Hz, stereo, s16, 125 kb/s
The video parts of each file seems to be mostly identical. So why Android refused to accept my movie? The answer is a file format or media container. I got it after an hour of detailed analyze because ffmpeg doesn't show it by default. The movie file I tried to watch has AVI format but Android expects 3GP files. So let's try to convert it now. To be on the safe place we will change audio part too to look like the one we have on Android movie I made as an experiment previously.
ffmpeg -i input.avi -vcodec mpeg4 -preset slow -bufsize 500k -threads 0 -ab 96k -ar 8000 -ac 1 -vb 1456k -ab 12k -s 640x480 -f 3gp output.3gpOr use video codec mpeg4, output file format 3GP, leave one audio channel with audio bitrate 12K, audio sampling frequency 8000, video bit rate 1456K and resolution 640x480.
Once I had converted the movie I uploaded it to my smartphone and found that I can watch it now.
How to rename multiple files on Linux
Sometimes we need to make something with tons of files. Just imagine you need either to remove white space or another char from 999 file names in some folder. Actually it isn't a manual task. Below the bash script that can help:
#!/bin/bash
d="/tmp/folder_with_files"
find "$d" -type f | while read F; do N=`echo $F|sed -n 's/\s//gp';`; mv -v "$F" $N; done
Subscribe to:
Posts (Atom)